Showing posts with label crochet tote. Show all posts

Thursday, February 25, 2016

My Geeky Love of Project Planning

My Geek Confession


Yes, I am such a geek when it comes to being organized and planning! My daughter makes fun of me when I get excited about a spreadsheet or accounting program. What can I say? I'm a geek!!

So speaking of My Geeky Love of Project Planning, I found a gorgeous and I mean gorgeous tote bag pattern on Ravelry just the other day. I of course saved it into my Library, but I couldn't just leave it in there. I kept looking at it and pulling up everyone's project info. I really do not have the time or yarn to do the project right now. I have way too many other projects that I need to conquer and complete, but there isn't anything wrong with "planning the project", right?

The project is The Enchanted Garden Tote by Courtney Laube. Now this isn't just some ordinary tote it is definitely Enchanted!! You have to use 3 different patterns to complete this tote. Yes, you read correctly, 3 different patterns! It will be a challenge. I will have to only have this pattern on my docket when it comes time to begin.

Picture courtesy of AFwifeCrochetNut 

Picture courtesy of AFwifeCrochetNut
Now isn't that just a beautiful project!! I have printed all of the patterns, which came to over 100 pages. I placed them in a 3 hole folder with tabs. I have highlighted areas that I need to keep an eye on when I begin the project such as when to switch from pattern to pattern. Yes, you have to work with all 3 patterns at the same time. Like, you might need to use pattern 1 for rows 1 - 7 and then pattern 3 for rows 9-13 then back to pattern 1 for rows 14 - 16 and then pattern 2 for rows 17 - 21 and so forth and so forth. So I am definitely reading this complete project prior to beginning it.


I have actually set up its own board in my Pinterest account. I am looking at different color schemes and pinning other completed projects to this board. I just love the looks of this project and if the first one turns out great then I will make more as Christmas presents to a few of my sweet family members (only the sweet ones though)!

That is my Geek Confession for this week. Everyone have a great rest of the week!!

Cheers,

Winnie

Monday, August 31, 2015

Solid Granny Square Tote

Since finishing my Wildflower Shoulder Bag CAL, I have been bitten by the crochet bag bug! I started on another smaller WSB but it is in hibernation until the fabric I have ordered for the lining is delivered. So I began working on my own version of a tote. I wanted the granny square look so I found a great tutorial on Ravelry for a solid granny square. The tutorial is by Tamara Kelly and can be found over on her blog, Moogly.

I take my hat off to all the wonderful crochet pattern designers out there.  Coming up with a design and figuring out the stitches per inch needed and what not is no easy task. For the first time I actually crocheted a swatch to give me the stitch count I needed to figure out the bottom and side of my tote.


I can say I am not the most organized person when I begin a project. I like to dive in and begin without having to think too much about what I am working on. So this project has me thinking more and really making it my own. I am sure there is a well written pattern for this type of tote, but I thought it can't be that hard. (yeah right) I've enjoyed the process though and really love the creative side of it. Yeah it's not fancy with a lot of bells and whistles but it is my own creation.

The solid granny square by Tamara Kelly came out to be 5 inches by 5 inches and I wanted 6 inches by 6 inches. I ended up doing two extra rows of single crochet to make it the size I needed.
My Granny prior to being blocked.
To achieve the size I wanted in this tote I needed six solid granny squares for each side. This would give me a width of 18 inches and a depth of 12 inches. Of course this is what the pure calculations would be, but you always have to factor in the seaming allowance so I had to go back and re-calculate my base and sides. Glad I decided to work up the front and back sides before I crocheted the base and attaching sides.


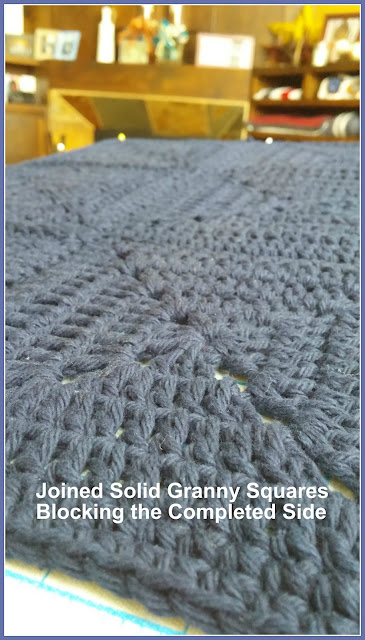
I joined the squares with a whip stitch join which gives almost no extra seaming width.


I really love the way the join looks on the front side of the joined squares.

Once I had all 12 squares joined I decided to block both sides again. This gives me a true 12 x 18 inch measurement.


I decided on a really cute houndstooth print cloth for the liner. I also decided for the handles I would use rope cord. This meant using grommets and I had never done a grommet before. It turned out pretty easy and fun because I got to hammer away. How often do you use a hammer on a crochet project?! I found the white rope cording on clearance at Michael's! I was ready to checkout when I realized I had not picked up the cord. As I was walking over to the area of the store that the cord should be I passed a clearance rack and that sweet white cord package stood out and I was able to nab it for under $3!!


I loved how it turned out. It measures 18" x 12" and is a perfect size for a Farmer's Market Tote or even a picnic tote.


I will be back later this week with an update on all my projects. I was very productive this weekend and finished up 4 WIPs!! Have a great week!!